If you’re using TeamCity as your Continuous Integration tool then you will be glad to know there’s a really easy way of getting a Build Radiator set up – and it’s very a quick job too, thanks to TeamCity doing most of the hard work for you by making a status page available.
The status page contains all the information we need for a basic Build Radiator but as it stands the default status page isn’t much to look at. With the help of a bit of jQuery to apply some jiggery-pokery and a little bit of CSS we can turn the text-heavy page into a starter for your own Build Radiator.
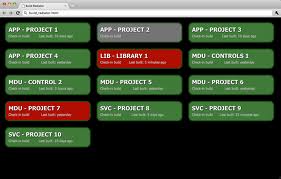
Here’s a picture of what we’re going to be working towards in this first step.
 You can create this HTML page on your desktop or on a server, whereever you like. Some of the best build radiators are the oldest computers you can find that will take Google Chrome. Chrome has a brilliant full-screen view, which you can get by loading a page and pressing F11. This hides everything, including the address bar which is left behind by some other browsers. Set the homepage of the browser to your build radiator and put a link to the browser in the startup folder of the OS and you’re done.
Onto the code…
Starting from the top of the page we need to add a meta tag to refresh the page every 30 seconds. Now you could do this with jQuery but for ease of use I just use a meta-refresh tag. Then we pull in the jQuery library – don’t forget to download this yourself and save it locally.
Now for the first bit of proper code. We need jQuery to interrogate the HTML from TeamCity and work out whether the builds were successful or not. We can do that by looking at the image TeamCity has assigned each build. Once we find the image we’ll add a CSS class to the parent table. Then we look for the build date and wrap a bit of text around it so that we can understand what it means when it’s displayed on the screen.
$(document).ready(function() {

  $("td.buildConfigurationName IMG[src *= 'success.gif']")
    .parents("table")
    .addClass("buildSuccess");

  $("td.buildConfigurationName IMG[src *= 'error.gif']")
    .parents("table")
    .addClass("buildFailure");

  $("td.buildConfigurationName IMG[src *= 'buildGray.gif']")
    .parents("table")
    .addClass("buildUnknown");

  $("DIV.teamCityDateTime").each(
    function(index) {
      var spanStr = $(this).find("SPAN.date").attr("title");
      $(this).replaceWith("<span class="buildDate">Last built: " + spanStr + "</span>");
    }
  );
});
Next up is the CSS. I’ve gone for a simple black background with colour coded rounded boxes to indicate the build status. It’s a great way of indicating the status really quickly and with the extra shadow behind the build name you can easily see what’s built and what’s failed from the furthest desk in our office.
body {
  background-color: #000;
  font-family: Tahoma;
  color: #FFF;
}

a {
  text-decoration: none;
  color: #FFF;
}

table.tcTable {
  -moz-border-radius: 20px;
  -webkit-border-radius: 20px;
  -khtml-border-radius: 20px;
  border-radius: 20px;
  border: 4px solid #1c4c16;
  padding: 8px;
  margin: 15px;
  float: left;
  width: 31%;
}

div.projectName a.buildTypeName {
  text-shadow: 1px 1px 2px #000;
  font-weight: bold;
  font-size: 1.5em;
  text-transform: uppercase;
}

td.buildConfigurationName a.buildTypeName, .buildDate {
  font-weight: normal;
  font-size: 0.9em;
  color: #bbb;
}

td.buildConfigurationName img, td.buildResults, div.teamCityBuildNumber {
  display:none;
}

.buildSuccess {background: #407A39;}
.buildFailure {background: #AF0E01;}
.buildUnknown {background: #747474;}
Once we’ve defined the jQuery and the CSS we can go ahead and pull in the TeamCity page. Thankfully we can do this in one line by requesting a javascript version of the status page. Our current build radiator runs on our internal PHP dev server so we use a PHP command to read the contents of the HTML version – but more on that in later posts as we build other elements into our build radiator. For now lets get TeamCity to do some of the work.
Don’t forget to put the location of your TeamCity server in the URL above.
Once you’ve done that you’re finished. Save the HTML page and open it up in your browser and you should find you have a quick and easy Build Radiator. This is by no means the best way of doing it, and I imagine lots of people will have recommendations on how to do it differently and possibly more efficiently – so bear in mind that this is only a starter. You can build on this and add other pieces of useful data to your Build Radiator.
I shall post more on this radiator topic in future – as we plug more functionality into our screens. Next up I’ll show you how to easily extract information from FogBugz to pull in support tickets and later on we’ll look at using the TeamCity API to make a more interactive Build Radiator.
RT @TopsyRT: DIY Build Radiator for TeamCity: Part One http://t.co/aHkgwwM
Hi,
Great post!
One minor tweak: for TC 6.5.x, I needed to change one CSS style from ‘table.tctable’ to ‘table.tcTable’.
David
Thanks for that. I’ll amend the original post.
Thanks for the post. I didn’t realize how easy it was to create your own radiator.
One question: is there a way to mark projects with a different color that are currently running?
thanks
Michael
There wasn’t when the radiator was first built but with JB releasing new builds of TC frequently there may well be by now. I will find out.
This is great! Fail Fast! DIY Build Radiator for #TeamCity: Part One: http://t.co/d36WzVyM #agile #continuousintegration
@GraemeF http://t.co/1mdmDzVI looks easy to get setup with team city
[…] Slowly, Slowly, Catchy Monkey DIY Build Radiator for TeamCity: Part One → […]
Some changes are required for TeamCity 8.0 and up, see Gist at https://gist.github.com/cedricwalter/6021647